Saturday, 15 June 2013

Heart Flower Garden

Good day traveller. Thanks for stopping by the Guild Hall today. If you’re a regular visitor here, you know we’ve been busy building our robot army in preparation for our assault on the Shrieking Harpies who laid waste on the Crafters Guild a while back. After days immersed in iron and oil, I needed to get outside the laboratory and interact with nature. I could feel my earth magic level dropping, and I needed to keep my spells strong for the impending battle. I decided to plant some heart flowers in the yard to brighten it up (this also game me an excuse to wear my new hat of +65 shadiness). Once fully bloomed these little guys will also produce a sweet nectar that can be used in numerous health and recovery potions.

This card was crafted for the Just Some Lines anything goes challenge that is happening now. Just make something using a JSL image and you could win some digis!


I started this one by colouring the Emo Gardener using my Prismacolor pencils of mass pigmentation and inking around the edges with Tea Dye Distress Ink. Setting that aside, I next cut out the wheelbarrow using the Freshly Picked cartridge. I thought it looked a little plain “as is”, so I used the Unity “You Give Me Tiny Butterflies” set to stamp on it. I also added a button to the wheel and a little bow using some “floss”. Next up, stamping all the leaves using the Bo Bunny “Camp-a-Lot” set and cutting them out. After everything was arranged, I stamped the sentiment using the Unity “Naturally You” set. 

I used the same set to stamp this panel on the inside. Shabby Shutters is fairly light, so I think you would still be able to write a message and sign your name over this, no problem. My only concern is that these obscure sentiments make the card lack purpose. This unfortunately lost me -50 generic exp points. Sad.

I went a little crazy on the envelope, using the Bo Bunny “Camp-a-Lot” set. But look how nicely it matches :D


This card will plant itself into the following challenges:

I ended up planting eighteen of the heart flowers. My direwolf ate three, leaving me with fifteen. Next project - building a fence around the new plants to keep Lycan out!


~ Guild Master Crystal ~

Friday, 14 June 2013

Project Robotz: Part 4

For our fourth design in the robot army we were amassing, we decided to create some tech-mech bots. These robots would wield deadly weapons and be the brunt of our attack. We needed to create a lot of them, as we expected to have a great number of them destroyed. Once they were completed, we lined them all up and flipped the switch. In unison, they beeped and saluted. Suddenly, one of the bots broke formation and started weaving in between the other robots, crashing into them and knocking some over. There was clearly some malfunction with this one, as its display screen kept flashing heart icons and the bot was repeating “hubba hubba” in its mechanical voice. 

This is the fourth card of the five card robot set (only one more:D). You can see the first card here, second card here and third card here. This one I started out by stamping the robot image using the Unity “Hubba Hubba” set. I coloured him up using Distress Markers and my Hydra Brush of +193 wet blendiness. Because I was incorporating that green gear paper into this card set, I decided to use it to stamp the sentiment on for this card because the font was so thick. The sentiment was also from the “Hubba Hubba” set. I then used the numbers stamp from the Tim Holtz “Reflections” set and stamped it using some Shabby Shutters Distress Ink...I think this is the first time I’ve ever used the numbers stamp from that set, earning me +201 virgin ink exp points. I stamped right overtop that robot for some interesting layering.

On the inside I stamped that same numbers stamp a few more times, then added the sentiment and the nuts and bolt from the Technique Tuesday “Tin Man” set.

I’m sure this doesn’t surprise you, but I also stamped that numbers stamp on the envelope to make everything match. If you know me, you know I love my envelope to match my card :D Shabby Shutters is a light enough colour, that you can write the address over top no problem.


This bot will be turned onto the following challenges:

As the malfunctioning bot whirled and crashed, I knew we needed to put a stop to this before any of the good bots were damaged. I took out a laser rifle and shot the love bot down. It collapsed in a pile of tin and smoke, inky black fluid leaking from the hole the laser rifle created. Only one more bot to create and then we would be ready to strike the Shrieking Harpies and exact our revenge.

See the fifth card in Project Robotz: Part 5!
See the box and all five cards in Project Robotz: The Final Battle!


~ Guild Master Crystal ~

Thursday, 13 June 2013

Project Robotz: Part 3

Preparations continue in the construction of our robot fleet. The scout bots were done and ready to go, and after working out all the wiring kinks with the battle bots, they too were set. For our third fleet, we attempted to make some agile bots that would be good not only on the battlefield, but also nimble enough for infiltration missions. Unfortunately, we had some construction issues in trying to build the bots skinnier than normal. Various appendages kept falling off and we were forced to use a heavy amount of binding runes to keep the poor fellows together.

This card is the third in the five card robot set I’m making. You can see the first one here and the second one here. I stamped the image using the Stampin Up “Lots of Bots” set - the second time I’ve used it since buying it last year (the first time was to make card #2 of this set - lol). I then coloured him up using Distress Markers and my Hydra Brush of Xtreme Wettiness and inked the edges using Shabby Shutters Distress Ink. The sentiment I stamped using the “Lots of Bots” set as well. I embossed the textured white paper using my Cuttlebug and the Robotz cartridge companion folder.

On the inside I stamped the sentiment using the Lawn Fawn “On the Mend” set and added the nuts and bolts using the “Lots of Bots” set. I love how the Shabby Shutters ink matches that patterned paper!

I stamped some more nuts and bolts on the envelope earning me +597 mechanical exp points.


This bot will break down in the following challenges:

We had to use some dark magics, but we finally got our nimble bots up to par with no limbs detaching. This class of bots will do well infiltrating the enemy base and making sneak attacks. Their high agility will also allow them to not only dodge blows in open combat, but land more strikes as well. Only two more bot classes to go and our army would be ready to strike the Shrieking Harpies!

See the fourth card in Project Robotz: Part 4!
See the fifth card in Project Robotz: Part 5! 
See the box and all five cards in Project Robotz: The Final Battle! 


~ Guild Master Crystal ~

Project Robotz: Part 2

With the first set of scout robots completed, we were ready to move onto the second fleet. We made the next model of bots rotund so they would have a high defence value in battles. Their plating was infused with liquid titanium and runes of strength to provide maximum effectiveness against all attacks. Unfortunately, there was a glitch when we were wiring the brains and for some reason, instead of laying waste upon our enemies, the first five we built were only interested in party planning! I don’t know what happened, but we had to take another look at the schematics. 

This card is the second in a set of five robots cards I’m making. You can see the first one here. I started by cutting the tag using the Art Philosophy cartridge. I then stamped the image using the Stampin’ Up “Lots of Bots” set. I got this set at a garage sale last summer and have yet to use it! No time like the present. Actually - this stamp set is what motivated me to make this set of robot cards! I coloured him in using Distress Markers and my Hydra Brush of +88 wetness. I then stamped the sentiment using the same set and inked around the edges using Shabby Shutters Distress Ink. I embossed the white strip using my Cuttlebug, earning myself +79 texturization exp points.

The sentiment on the inside I stamped using the Technique Tuesday “Tin Man” set. The little nuts and bolts came from the “Lots of Bots” set.

On the envelope I stamped some gears using the Unity “Nuts and Bolts” set.


This bot will party on in the following challenges:
Top Tip Tuesday Challenge #103: Masculine TIP: I don’t know if this is common knowledge, but I just found this out - store you Distress Markers HORIZONTALLY! I was storing mine vertically in the container they came in, and after switching, some markers I thought were dead came back to life! ZOMBIE MARKERS!

The malfunctioning robots had planned and executed such a lovely party, it seemed a shame for it to go to waste. As such, the Guardian of Glitter, Lady Commander of Copics and I took a break from building our robot army and had some cake, played some party games and opened some presents (I’m still not sure where all this stuff came from).

See the third card in Project Robotz: Part 3!
See the fourth card in Project Robotz: Part 4! 
See the fifth card in Project Robotz: Part 5! 
See the box and all five cards in Project Robotz: The Final Battle! 


~ Guild Master Crystal ~

Monday, 10 June 2013

Gimme a Ranch Hand

Welcome to the Guild Hall. Thanks for stopping by. Today the Guardian of Glitter and I paid a visit to Lon Lon’s Ranch to help old Farmer Farley with some chores. His arthritis has been ailing him with -93 speed points and -382 agility points and he asked if we would be able to lend a hand for the day around the ranch. While not the most glamorous quest, it did provide me with the inspiration for a craft I’d been neglecting to make.

I designed this for Creative Card Crew’s “Metal” challenge that is happening now! Use some metal and you can win a prize from one of our two sponsors, Pizzazz Aplenty and QKR Stampede.
 
I started this card by colouring the QKR image with Prismacolors. Instead of blending with Gamsol like I normally do, I decided to leave this one “raw”, earning me +193 unconventional exp points. I inked around the edges and then lightly stamped the corners with the Unity “Cooped Up Notes” stamp. After that was done, I picked out some papers to use and arranged them, using the sentiment from The Greeting Farm’s “Creeper Crew Collection,” thinking myself rather clever, since it was an image of a rocking horse. Then came the hard part. To use some metal. 
I don’t own any charms, or stick pins and didn’t want to have to resort to brads, so I decided to make the weird little embellishments you see using some old key tag rings from work and wrapping this brown cord around it. (Yay - I’m over 6! I can play with this! Thanks Elmer...click the picture to make it bigger to see what I'm blabbering on about). Also...I seriously need to get a smaller glue gun! (as you can tell by the bottom ring) Buuuuuut I'm cheap and want to use all the "big" glue I have first before getting a small hot glue gun.


On the inside I used the leftover strip of wood grain paper and stamped the sentiment using the My Creative Time “Wow! So Many Candles!” set. I then doodled some lines around the edge for added interest. (I know I'm certainly more interested).


I stamped the envelope using the Dylusions “Bordering on the Edge” set because this image kinda reminded me of “lassos”....well...when stamped in brown ink anyways.

This wooden horse will be rocking into the following challenges:

After all the farmy chores were complete, the Guardian of Glitter and I headed on back to the Guild Hall, stopping along the way to catch some fish, pick some fruit, shake some trees, dig some holes, bang some rocks, chat with some animals, hunt some bugs....


~ Guild Master Crystal ~

Saturday, 8 June 2013

Sticking My Neck Out

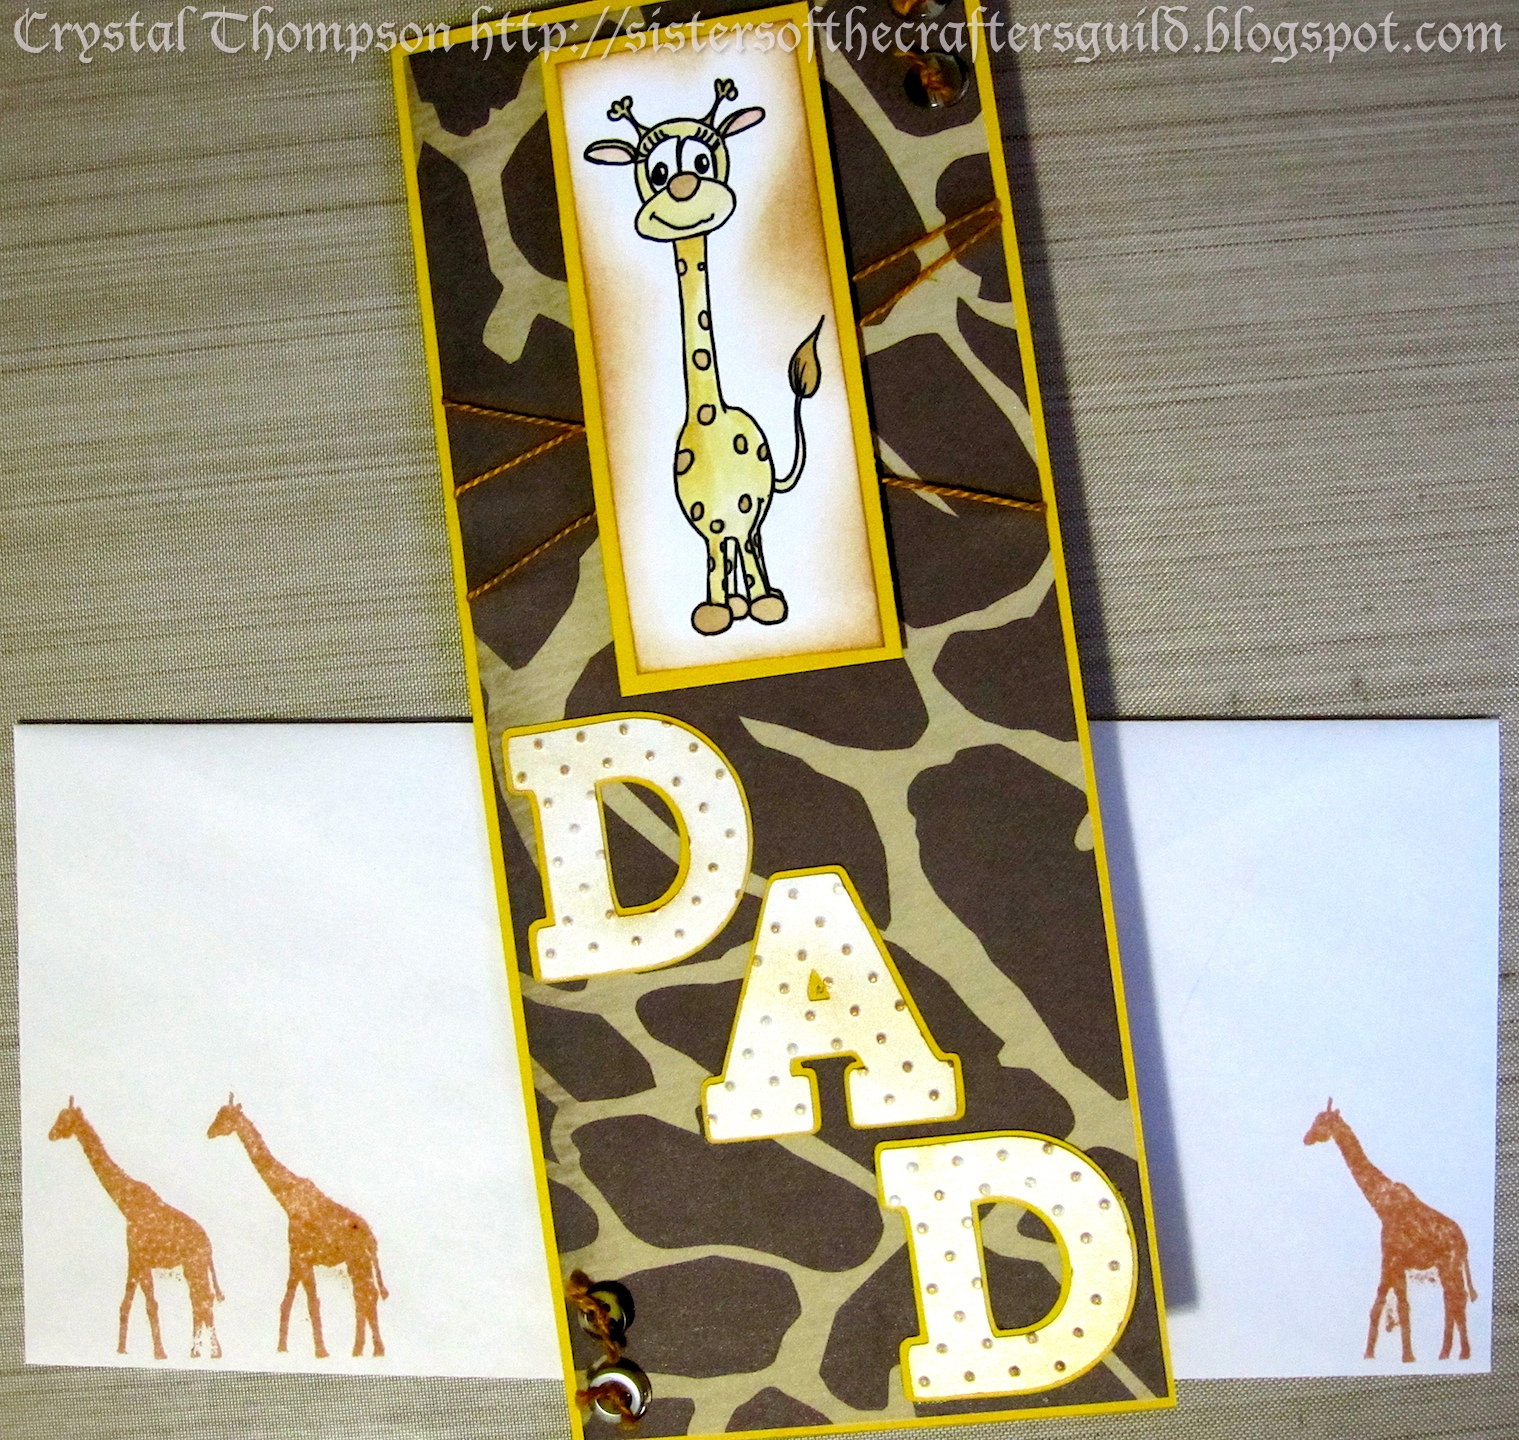
Today the Lady Commander of Copics and I were travelling through the Scattered Straw Wastelands, when we came upon some strange creatures. These spotted beasts had abnormally long necks and seemed gentle enough, but we didn’t want to spook them. We cast a spell of +69 stealth so we could follow them without being detected. Just as we were admiring their beauty, things got messy.

This card was created for the Just Some Lines reminder about our anything goes challenge happening now! Join in using any JSL image and you can win MORE JSL images! Simple as that.

I started by colouring this cute giraffe using my Distress Markers and Brush of +80 h-two-o. I then inked around the edges using Tea Dye Distress Ink. I made this a tall card cuz...well...giraffes are tall...I cut the letters out using the Birthday Bash cartridge and ran them through the Cuttlebug for some added texture. I also swiped some Tea Dye ink over them as well, because they were a little too stark for my taste. Some buttons and thread finished off the front.

The inside sentiment came from the scary depths of my brain...meaning I just typed it out and printed it off my computer.

I used the Mark’s Finest Paper “Be Wild & Free” set to stamp the giraffes on the envelope using Tea Dye Distress Ink.

This card will stick its neck into the following challenges:

As we watched in horror, the creatures started snatching birds out of the air, mid-flight! They crushed the birds with their powerful jaws, swallowing the dead carcasses. Obviously, these beasts were not the gentle animals we took them for. Not wanting to enrage them and start a battle, the Lady Commander and I quickly left the area and made notes on our maps to ensure we don’t accidentally come across these savage creatures when traversing the Scattered Straw Wastelands again.

~ Guild Master Crystal ~